How exciting! Of course it won't arrive for a while. They don't have them in stock so we will have a little time to clean the shop, sharpen tools, and get ready for the day Mr. Partain delivers the goods to my door.
We are finishing up the elevators. The right elevator trailing edge was JB Welded Wednesday and this evening I opened it up and started cleaning the excess material.
It looks very straight and I'm very pleased with the product.
Thursday, January 31, 2008
Saturday, January 26, 2008
Rudder is finished!
Last night we finished off the rudder. The trailing edge turned out very nice. Thanks to Jim Triggs and Paul Westcott for their help and advice. Jim suggested using JB Weld to lock the wedge together with the skin before we riveted.
It worked great! Here is a picture of the assembly curing. In addition to the JB Weld we match drilled two pieces of aluminum angle and clecoed it all together to keep a nice straight edge.
 We also added a reversed wedge to make it all fit together well. You can click on the image to see more detail. Our first application of JB Weld had a few spots that didn't bond. So we reapplied the JB Weld and heated the mix to make it flow better. It worked well.
It worked great! Here is a picture of the assembly curing. In addition to the JB Weld we match drilled two pieces of aluminum angle and clecoed it all together to keep a nice straight edge.

 We also added a reversed wedge to make it all fit together well. You can click on the image to see more detail. Our first application of JB Weld had a few spots that didn't bond. So we reapplied the JB Weld and heated the mix to make it flow better. It worked well.
Saturday, January 19, 2008
Rudder work continues
Last night we formulated a plan for how we would apply the JB Weld to the trailing edge. We are both feeling a little tentative since we have no experience at this. We have a plan though and we have a test joining of two pieces of scrap aluminum. Stay tuned, I will take pictures of the process.
A word of caution. JB Weld is a nice strong adhesive for metal. It takes about 24 hours for it to set up. We learned the hard way that it's important to use saran wrap to keep your clecoes from becoming welded to your work. If you cover the welded area with saran wrap before you clamp it removal of the clecoes is no big deal, but if you don't use saran wrap, I wish you luck on extricating your clamps from the work without buggering up the part. At the very least you will have to destroy some of the clecoes. Trust me!
A word of caution. JB Weld is a nice strong adhesive for metal. It takes about 24 hours for it to set up. We learned the hard way that it's important to use saran wrap to keep your clecoes from becoming welded to your work. If you cover the welded area with saran wrap before you clamp it removal of the clecoes is no big deal, but if you don't use saran wrap, I wish you luck on extricating your clamps from the work without buggering up the part. At the very least you will have to destroy some of the clecoes. Trust me!
Thursday, January 17, 2008
Rudder nearly completed
Last night was spent preparing for finishing up the Rudder. We match drilled two pieces of aluminum angle to hold the trailing edge together. The trailing edge is nice and straight when the angles are attached. I hope it holds that line when we start putting the rivets in.
We also called a couple of mentors to see how they did the trailing edge. We talked about pro-seal and settled on using JB weld. I've never used either one so I'm a little nervous. JB Weld is pretty cheap; about $5.00 for the two tubes. I gather they get mixed together before it's applied.
Tomorrow I will make a trip to the airport to get a couple nylock nuts for the counterweight. Once it is secured we can press on to the finish with the rudder. We are both pleased with the way things are shaping up, but we would like to be moving faster...
Subscribe to:
Posts (Atom)
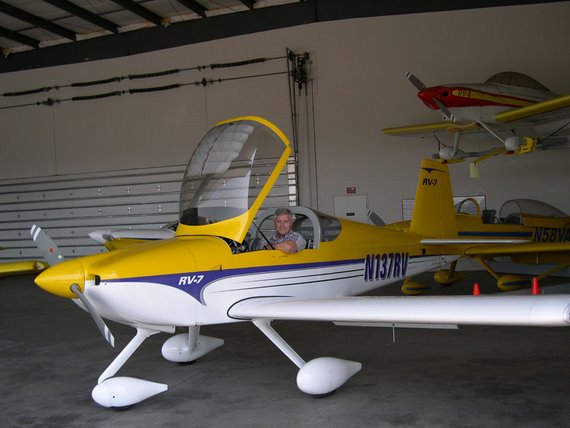
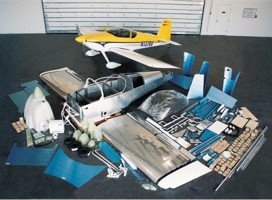
Before we decided to build an RV9A we were looking at the RV7A. This picture was taken on a factory tour.
Standard (aka Slow build) RV9a kit
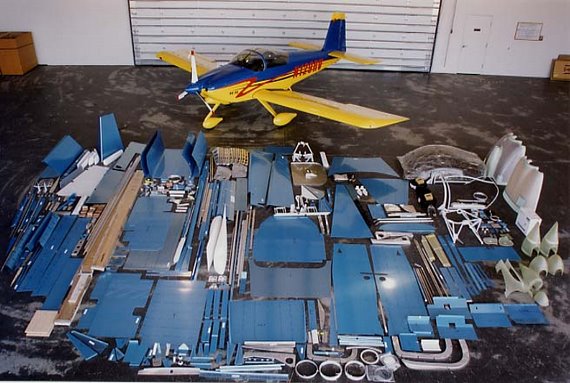
Quick build RV7 kit