Friday, June 29, 2012
It's shocking how out of date I've let this become. We were at the point where we were considering giving up on the project. Then a friend came by and sparked the dream again. He said, "You have to do this! If you don't, it will haunt you." So we decided to enlist the assistance of Synergy in Eugene. Wally Anderson (the owner of Synergy) said he thought we could finish it up in a few weeks with their help. So June 13th Bob and I drove the whole project down to Eugene. Wally tells us that it will go faster than he thought, because "you've already done all the hard stuff". We will be working on it thru August and expect to have it finished by September.

Saturday, June 19, 2010
Back in the air
I got fed up with this not flying thing. So I went in and hired a CFI to help me make sure I'm still safe. We did about 1.5 hours on the ground and 1.8 in the air. I was pleased to still know what to do.
So I reserved a plane for Saturday to fly to Scappoose. Then this morning the weather was marginal and so was my health. I decided to stay on the ground today.
So I reserved a plane for Saturday to fly to Scappoose. Then this morning the weather was marginal and so was my health. I decided to stay on the ground today.
Sunday, June 6, 2010
Wrapping up the Roll bar
We've gotten the roll bar all riveted together, and now we are working on the custom fit with the brackets. Here are a few shots of the process.

First we started by clamping the parts to a rigid board. Then we secured the parts to the board with clamps and clecoes. We tried to be very careful with the width and the height. Also we measured the mid-point as a control.

We measured carefully to space the holes properly. Nobody is better at careful measurement than Bob.

Then we riveted the F-631 plate to the channels. We chose to pop rivet the assembly to the board so it wouldn't move while we were working on it.

We used a clamp to hold the pieces in the proper place.
After we got the back side all drilled, we determined that the flanges of the channels were not at a 90 degree angle. The reason we were concerned is because there was a gap between the flange and the strap. So we tried to fix that by bending with a spanner wrench. This proved to be effective but a little tedious.
There were many iterations of adjusting, checking and marking. Then do it again. Finally the fit was darn near perfect. One concern was the marks left in the radius of the bend by the spanner wrench. We were able for the most part to scotch brite out these marks.

When it came time to drill the front side channels, we made a tool to keep a 1.5" total thickness. For the most part it worked well, but we found that when it was all riveted together the bottom of the bow was 1/10" wider than expected on both ends (1.6"). There isn't much that can be done at this point, but we decided it will be okay.

We press on. Now we are working on the attachments to the fuselage. As you know they are a custom fit.

First we started by clamping the parts to a rigid board. Then we secured the parts to the board with clamps and clecoes. We tried to be very careful with the width and the height. Also we measured the mid-point as a control.

We measured carefully to space the holes properly. Nobody is better at careful measurement than Bob.

Then we riveted the F-631 plate to the channels. We chose to pop rivet the assembly to the board so it wouldn't move while we were working on it.

We used a clamp to hold the pieces in the proper place.
After we got the back side all drilled, we determined that the flanges of the channels were not at a 90 degree angle. The reason we were concerned is because there was a gap between the flange and the strap. So we tried to fix that by bending with a spanner wrench. This proved to be effective but a little tedious.

There were many iterations of adjusting, checking and marking. Then do it again. Finally the fit was darn near perfect. One concern was the marks left in the radius of the bend by the spanner wrench. We were able for the most part to scotch brite out these marks.

When it came time to drill the front side channels, we made a tool to keep a 1.5" total thickness. For the most part it worked well, but we found that when it was all riveted together the bottom of the bow was 1/10" wider than expected on both ends (1.6"). There isn't much that can be done at this point, but we decided it will be okay.

We press on. Now we are working on the attachments to the fuselage. As you know they are a custom fit.
Wednesday, May 12, 2010
Starting on the roll bar
Bob got back from three weeks of traveling last night. Master Chief is still missing in action (on a cruise).
Tonight I worked at my tube bending technique. Still needs work.
The 21' of new tubing and the screws I ordered have arrived. I am not too sure about the tiny little allen heads. I'm afraid I may break an allen wrench if I have to torque on these to get them set.

I bought a plastic covered piece of shelving material for laying up our roll bar. The board is really stiff. I think it will work well. I was glad that Bob and I were working together; instead of 'close enough' We came close to breaking out the micrometer.

Here's a picture of the tunnel mod we finally settled on. It's a little embarrassing to think how much time was spent doing this. The benefit will come if we ever need to access where the fuel line come out of the tunnel.


As you may know, I've been kind of consumed with the idea of rolling my own lights with LED's. So while I was at Sun n' Fun a few weeks ago, I snapped a couple pictures of interesting applications. I'm still fussing over how I want to do ours.
Tonight I worked at my tube bending technique. Still needs work.
The 21' of new tubing and the screws I ordered have arrived. I am not too sure about the tiny little allen heads. I'm afraid I may break an allen wrench if I have to torque on these to get them set.

I bought a plastic covered piece of shelving material for laying up our roll bar. The board is really stiff. I think it will work well. I was glad that Bob and I were working together; instead of 'close enough' We came close to breaking out the micrometer.

Here's a picture of the tunnel mod we finally settled on. It's a little embarrassing to think how much time was spent doing this. The benefit will come if we ever need to access where the fuel line come out of the tunnel.


As you may know, I've been kind of consumed with the idea of rolling my own lights with LED's. So while I was at Sun n' Fun a few weeks ago, I snapped a couple pictures of interesting applications. I'm still fussing over how I want to do ours.
Tuesday, March 2, 2010
We continue to work
Most recently Bob has been working on the center section between the fuel selector and the firewall. He has devised a plan to modify the access panel below the cabin heat distributor box. He is working on the finer points of that.
Last night I was working on the rudder pedals; installing the cotter pins in the castle nuts. Also, getting the brake lines ready for installation. I still wrestle with the idea of spending more money for better brake lines, but see lots of big ticket items still looming on the horizon.
I've been researching LED's and how to design the wingtip lighting.
Also, I've been reading up on the roll bar and how it goes together. I need to come up with a board that will be suitable to clamp the roll bar down and keep it straight.
We are often anxious to make better progress, but take solace in the knowledge that this is not a race. It is a hobby, and we are constantly learning new skills in the process of building. We can't help but be eager to 'gitter done'.
Last night I was working on the rudder pedals; installing the cotter pins in the castle nuts. Also, getting the brake lines ready for installation. I still wrestle with the idea of spending more money for better brake lines, but see lots of big ticket items still looming on the horizon.
I've been researching LED's and how to design the wingtip lighting.
Also, I've been reading up on the roll bar and how it goes together. I need to come up with a board that will be suitable to clamp the roll bar down and keep it straight.
We are often anxious to make better progress, but take solace in the knowledge that this is not a race. It is a hobby, and we are constantly learning new skills in the process of building. We can't help but be eager to 'gitter done'.
Thursday, February 11, 2010
Heater
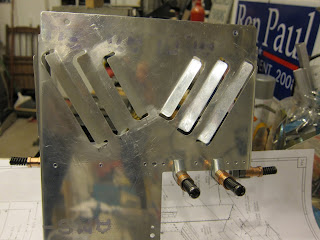
Bob is working on the pieces that will become our cabin heater. It will also, be the cover for our fuel lines.
A welding we will go...
 We had an informative presentation about welding at the chapter meeting Tuesday evening.
After the presentation, those that wanted could try their hand at striking an arc.
For myself, I found the information interesting, but I'm happy that I have friends who can weld.
Saturday, January 30, 2010
A visit to Catto propellers
My wife and I drove from Olympia to San Diego to take a cruise with the family in December. On the way South, I decided to drop the prop off at Catto Propellers to have the spinner cut for it.
 If you don't know where Mokelumne Hill, CA is; it roughly East of Sacramento. I had purchased a Tom Tom GPS to aid with my land navigation. I'm glad I did as it was able to guide me to the trail head of the one lane winding road that took us eventually to the factory. It's about a 15 minute drive once you find the trail. Here is what the terrain looks like.

My cell phone had lost contact with civilization and the GPS said I had left the road. So I wondered as I kept going up this winding ice covered road what I would do if something happened. Visions of survivor man were tripping thru my head. Can I start a fire?... I digress.
Anyway I had faith and wanted very much to meet Craig and visit the birthplace of our beautiful propeller.

I had found the entrance, but didn't have the code to open the gate.
Did I mention my cell phone was useless?
Fortunately, the neighbor let me use his land line to contact Craig and he let us in.
I don't think they get many visitors up here.

Since it's people that are really important let me introduce Craig.
Craig is very kind and knowledgeable.
He explained to me that he is in the process of expanding his operation to keep up with demand.
Each of the clipboards you see on the walls represents a propeller order.

There are two full time employees at Catto.
Nadine is the office manager.
She has been very helpful to me.

Manny is the wizard's apprentice and works in the factory.

Here are some of the rough-cut wooden cores.
After they are worked down to their finish cross section, there are two layers of carbon fiber and four layers of fiberglass applied.
The finished product is light, strong, and efficient.
Craig was telling me that many of the racers use his propellers.

As a part of the expansion, Craig was showing me this apparatus which is used to create a 3D digital model of the airfoil.
This will then be used to direct a three axis router.
This should ensure that every prop is exactly to spec and do it quickly.

So we left the propeller there and continued on to our vacation cruise.
On our way back, Manny was kind enough to meet us at the trail head
with our prop, spinner and extension plate.
Here's another VAF siting.
I am glad we took the side trip.

Our party included nine adults and seven grandkids.
Having the whole family together (for me)made it the best cruise so far.
 If you don't know where Mokelumne Hill, CA is; it roughly East of Sacramento. I had purchased a Tom Tom GPS to aid with my land navigation. I'm glad I did as it was able to guide me to the trail head of the one lane winding road that took us eventually to the factory. It's about a 15 minute drive once you find the trail. Here is what the terrain looks like.

My cell phone had lost contact with civilization and the GPS said I had left the road. So I wondered as I kept going up this winding ice covered road what I would do if something happened. Visions of survivor man were tripping thru my head. Can I start a fire?... I digress.
Anyway I had faith and wanted very much to meet Craig and visit the birthplace of our beautiful propeller.

I had found the entrance, but didn't have the code to open the gate.
Did I mention my cell phone was useless?
Fortunately, the neighbor let me use his land line to contact Craig and he let us in.
I don't think they get many visitors up here.

Since it's people that are really important let me introduce Craig.
Craig is very kind and knowledgeable.
He explained to me that he is in the process of expanding his operation to keep up with demand.
Each of the clipboards you see on the walls represents a propeller order.

There are two full time employees at Catto.
Nadine is the office manager.
She has been very helpful to me.

Manny is the wizard's apprentice and works in the factory.

Here are some of the rough-cut wooden cores.
After they are worked down to their finish cross section, there are two layers of carbon fiber and four layers of fiberglass applied.
The finished product is light, strong, and efficient.
Craig was telling me that many of the racers use his propellers.

As a part of the expansion, Craig was showing me this apparatus which is used to create a 3D digital model of the airfoil.
This will then be used to direct a three axis router.
This should ensure that every prop is exactly to spec and do it quickly.

So we left the propeller there and continued on to our vacation cruise.
On our way back, Manny was kind enough to meet us at the trail head
with our prop, spinner and extension plate.
Here's another VAF siting.
I am glad we took the side trip.

Our party included nine adults and seven grandkids.
Having the whole family together (for me)made it the best cruise so far.
Engine has arrived

I approached Gerber Collision and Glass about the possibility of having the engine delivered to their loading dock. I'm pleased to announce that Kirk was willing to do that. Very kind! In talking with him I think that he has an love of flying too. He seemed keen to talk airplanes with me.

Anyway, I called for a few volunteers to help with the lifting.
Here they are:Boyd on the right, Rich in the foreground and Bob in the blue jacket on the left.
While I was gathering timbers to slide it into the truck, they just picked it up and set it in.
From Gerber's loading dock to the Brooks Aircraft factory floor took only twenty minutes. I was there to help take it off the truck. Take it from me; it's HEAVY.

Bob and I spent some time looking through all the printed material and assorted parts.
Wednesday, January 6, 2010
Brake return springs installed

I saw this mod on another builders site and on RivetBangers and liked it. It was simple to implement and only cost 12$ for the materials to do all 4 brake cylinders.
These are the McMaster part numbers and descriptions:
6389K625 - NYLON BEARING, FLANGED, FOR 3/8" SHAFT DIA, 1/2" OD, 3/8" LENGTH
9657K115 - STEEL COMPRESSION SPRING, ZNC-PLTD SPRING-TEMPERED, 3" L, 1/2" OD, .047" DIA
9946K13 - ALUMINUM SET SCREW SHAFT COLLAR, 3/8" BORE, 3/4" OUTSIDE DIAMETER, 3/8" WIDTH

This is how they look assembled. You'll notice that I also replaced the multiple washers with a piece of round UHMW I purchased. The material is very cheap and fairly easy to work with. I simply measured how long it needed to be and then drilled the appropriate size hole and cut to length. If I do say so myself, I think it way cooler than 4 or 5 washers looking like we really weren't sure what we were doing.
 Last night I noticed that the elevator push rod was in a bind with the flap actuator attachment.
There were two different parts that could be used for this. We cogitated over them and chose the one we thought looked stronger without realizing the bind it would create. I took remedial action and removed the extra material.
Not a problem, but I'm glad I caught it.

Proceeded laying up the the tunnel cover F-741B.
I confess with humility my envy when I read of other builders spending two hours for some major task.
Then this little cover takes us the better part of an evening.

Here Bob does the countersinking.

And voila; the finished product.
Engine is ready to ship. Unfortunately, I need to have a loading dock to get it delivered to Olympia. Otherwise, they want me to pick it up in Tukwilla (45min drive).
I think I'll have to find a loading dock.
Wednesday, November 11, 2009
Seat backs ready to assemble

We finished all the fitting, drilling, de-burring and now the two seat backs are ready to prime and rivet. Decided not to prime them (yet).
Thursday, October 29, 2009
Progress update
Having finished the preparation of the crotch strap attachment, we decided to hold off riveting them in until we've connected up the controls; just to make it a little easier.
We now move on to assembling the seat backs. We've prepared all the parts and so now we mark and pre-drill the holes for riveting. We decided to pre-drill at 3/32" even though they will end up at 1/8". Photos will be posted soon.
Had hoped to work ahead, but this weekend Dad broke his hip and is in the hospital.
We now move on to assembling the seat backs. We've prepared all the parts and so now we mark and pre-drill the holes for riveting. We decided to pre-drill at 3/32" even though they will end up at 1/8". Photos will be posted soon.
Had hoped to work ahead, but this weekend Dad broke his hip and is in the hospital.
Friday, October 23, 2009
Thursday, October 15, 2009
Steps and other stuff
 Last night with the help of two friends, we got both steps ready to attach. Although we've been told it was unnecessary to add a doubler on the inside, we did it anyway. And it makes me feel better. After they left me, I tidied up the doubler plates and de-burred all the holes.
We probably won't attach for awhile just to avoid running into them with an unguarded shin. Besides, I want to get them all nicely primed and painted before they get riveted on. I plan to do some cosmetic grinding and removal of any rough edges.
Below is an inside view of the port side step.

I also learned of a company in Florida that makes engine cowls, plenums an wheel pants that promise to add speed to the plane. The plenum promises to keep all four cylinders cooled uniformly. The company is named James Aircraft and here is a link to their website
Earlier in the week, I ordered the attachment for the restraint system from Vans. It gets installed between the ribs under your seat.
Tuesday, September 29, 2009
Restraint

All my life I've been told that I needed to use more restraint, I went and bought some for the plane. Got two units on ebay for just under $100 total.
Last night I cleaned out all the aluminium dust and misc debris from the fuselage. Then we riveted down the seat and the pitch servo attach bracket. We also test fitted the control levers and connecting rods. It make it more fun when you make airplane sounds if you can do a hard bank...
We seem to be making progress each build night, and that is great. Now my challenge is to line out the work for the next session and try to have things ready to roll when help arrives.
Tuesday, September 15, 2009
Fuselage work
Last night Master-Chief Bob and I located and drilled the bracket that will hold the pitch servo for the autopilot. It was good to have someone holding back pressure on the piece while I was drilling.
We also clamped and drilled the angle that holds the seat back. Next time we will be able to do some riveting.
We also clamped and drilled the angle that holds the seat back. Next time we will be able to do some riveting.
Monday, September 14, 2009
Boost pump

Since our engine will be fuel injected, I called and ordered the Andair boost pump and filter assembly. Also bought a fuel selector valve while I was in the business.
They arrived and are elegant in their simplicity.
Wednesday, September 2, 2009
New engine on order
We drove from Federal Way to Kamloops BC on Aug 21st arriving 07:30 at the Aerosport facility on the airport. It was a 6 hour drive. We spent about 4 hours of Bart's time getting all our questions answered. At the end we ordered a new IO320 160 hp fuel injected engine with a hybrid ignition system; one slik mag and one electronic ignition. That means we will have aviation plugs on the bottom and automotive plugs on the top. We both were glad that we made the trip as we wanted to fully understand what and why we chose what we did. Since we are not ready for the engine we asked for a December delivery date. Can't wait to see it under the tree...
Tuesday, August 4, 2009
Progress report - electric flaps
No good decision will go unchallenged! Don't believe me? Try it! There seems to always be something waiting in the wings to become a crisis or a distraction. Never the less we continue moving forward.
Yesterday we made progress on the electronic flap housing. I am working with two retired Navy chief petty officers; one senior and the other master. The dynamic is really good. The master has much more experience than the two of us combined. So he is able to keep us moving forward when the tendency in the past has been to stop for prolonged periods of cogitation and hand wringing when something is unclear. His credibility is more convincing than my 'gitter done' mentality too. Our master chief also has the wonderful ability to give input without dominating. We are very fortunate to have him helping us.
The plans call for a part to be fabricated from a piece of aluminum. The first was pretty good, so I made a second that was pretty bad. Then I purchased more angle, thinking I would make another closer to perfect. In reviewing the first one we decided that the first piece would do nicely and that I was being too hard on myself. It's hard to know when you're doing that if you've never built one before...
Our new Catto propeller arrived last week and boy is it pretty! Light too; only 30 pounds. Now I need to find a place for it until it has an engine to hang on. I asked Craig about maintenance and he indicates that it's pretty much maintenance free. Regarding storage; he suggested laying it flat rather than letting it sit on the wingtips. Here's a picture from the Catto website that shows how it's built.

I am planning to go to Kamloops B.C. this week to chat with Bart at Aerosport about an engine. Should be a real education as I know almost nothing about engines.
Yesterday we made progress on the electronic flap housing. I am working with two retired Navy chief petty officers; one senior and the other master. The dynamic is really good. The master has much more experience than the two of us combined. So he is able to keep us moving forward when the tendency in the past has been to stop for prolonged periods of cogitation and hand wringing when something is unclear. His credibility is more convincing than my 'gitter done' mentality too. Our master chief also has the wonderful ability to give input without dominating. We are very fortunate to have him helping us.
The plans call for a part to be fabricated from a piece of aluminum. The first was pretty good, so I made a second that was pretty bad. Then I purchased more angle, thinking I would make another closer to perfect. In reviewing the first one we decided that the first piece would do nicely and that I was being too hard on myself. It's hard to know when you're doing that if you've never built one before...
Our new Catto propeller arrived last week and boy is it pretty! Light too; only 30 pounds.
 Now I need to find a place for it until it has an engine to hang on. I asked Craig about maintenance and he indicates that it's pretty much maintenance free. Regarding storage; he suggested laying it flat rather than letting it sit on the wingtips. Here's a picture from the Catto website that shows how it's built.

I am planning to go to Kamloops B.C. this week to chat with Bart at Aerosport about an engine. Should be a real education as I know almost nothing about engines.
Monday, May 18, 2009
Let's get back to work
As you can see, the last post was three months ago. That's about how long it's been since any real work was done on the plane. What happened was this; we ripped out our fireplace and chimney which had been a visual barrier between the kitchen and the lake. After they were removed, we installed a skylite, a new island and cooktop, and tiled the kitchen. Oh, we also added five feet of glass to the view of the lake. Here's are a couple of after shots. Until one lives thru a remodel and all the associated mess, you can't appreciate it. 

So anyway, the remodel is done with only minor things to finish. My wife is happy and everyone that sees it is impressed. I still find myself stopping just to appreciate the beauty.
Now about the plane; You can imagine the state of the shop after 2+ months of remodelling. Every tool out, nothing put away, just one heck of a mess. So a couple days of cleaning and putting things away and now we can find the wings and the fuselage again.
We have found a local fellow with more experience than us who also has the time to spend with us. His name is Bob and we are hopeful that we can get some momentum back and get this project rolling again. Stay tuned!


So anyway, the remodel is done with only minor things to finish. My wife is happy and everyone that sees it is impressed. I still find myself stopping just to appreciate the beauty.
Now about the plane; You can imagine the state of the shop after 2+ months of remodelling. Every tool out, nothing put away, just one heck of a mess. So a couple days of cleaning and putting things away and now we can find the wings and the fuselage again.
We have found a local fellow with more experience than us who also has the time to spend with us. His name is Bob and we are hopeful that we can get some momentum back and get this project rolling again. Stay tuned!
Subscribe to:
Posts (Atom)
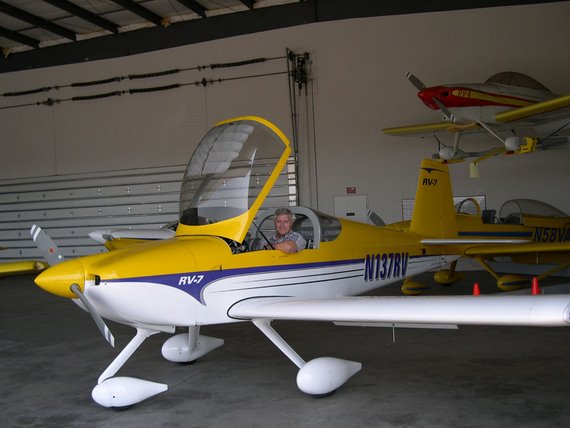
Before we decided to build an RV9A we were looking at the RV7A. This picture was taken on a factory tour.
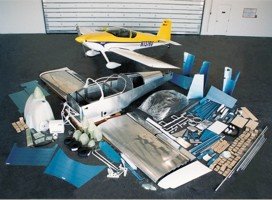
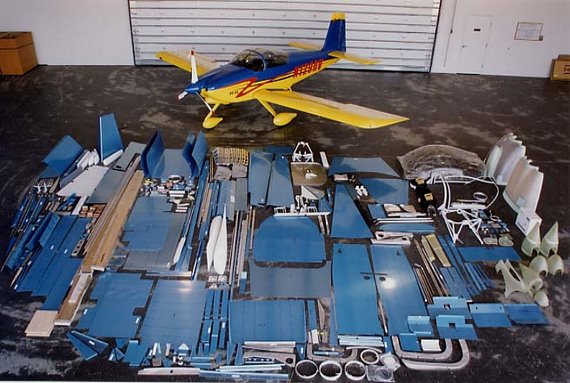
Standard (aka Slow build) RV9a kit
Quick build RV7 kit